


In the fast-changing world of web development, we often need smart ways to handle how our websites remember things. Imagine building a big and complicated website – we might need help keeping track of lots of information. That's where Redux and Redux Toolkit come in!
In this article, we're going to take a fun journey to learn about Redux and how Redux Toolkit makes it even simpler. We'll do this by working on hands-on projects, like building a simple Add-to-Cart project So, let's get started:
What is Redux?
Redux is a JavaScript library that helps you manage and organize the data (state) in your web applications. It keeps track of things that change as users interact with your website, making it easier to handle and update this data in a structured way. In essence, Redux simplifies how you deal with data in your web projects.
Think of Redux as a superhero that helps organize and manage all the information on our website. It keeps things neat, so we don't get lost.
Core concepts of Redux:
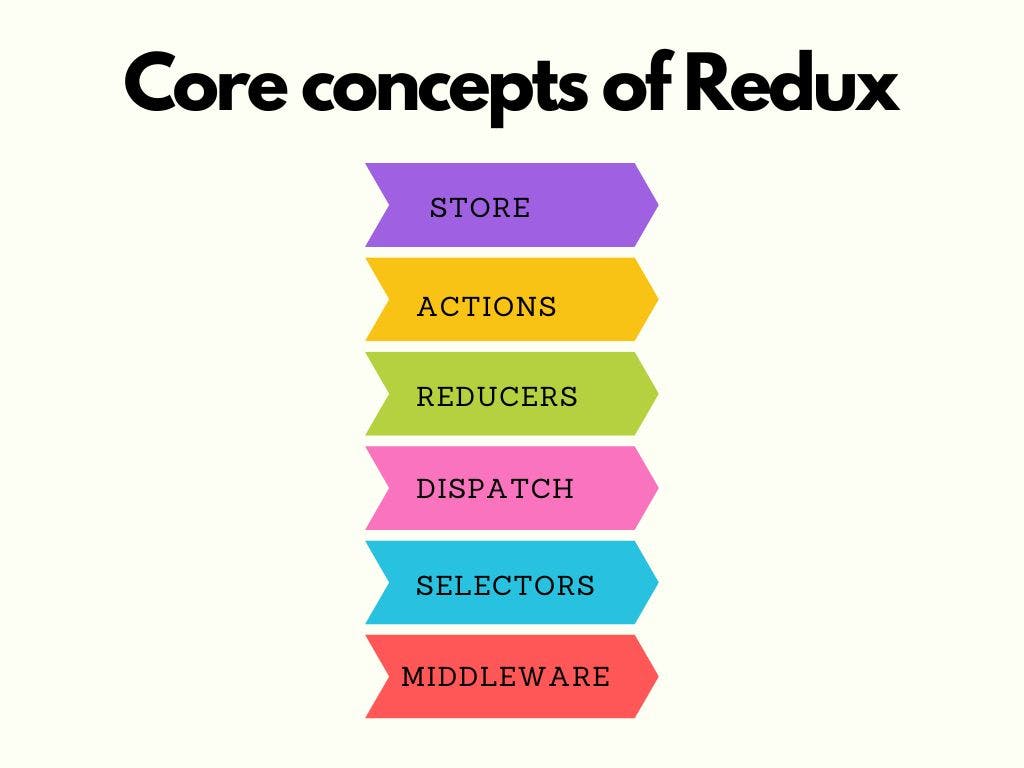
Store:
Store is the central place where all of your application's state is stored. This state represents the data that your application needs to function.
Actions:
Actions are plain JavaScript objects that describe what has happened in your application. They are used to trigger changes to the state. An action typically has a type field that describes the action and may also contain additional data.
Reducers:
These are the Functions that specify how the application's state changes in response to actions. They use the current state and an action as input to produce a new state. Reducers are pure functions, meaning they do not modify the existing state but produce a new state based on the previous state and the action.
Dispatch:
Dispatch is the process of sending an action to the store to update the state. When you dispatch an action, Redux uses the reducer functions to determine how the state should change.
Selectors:
These are the Functions that allow you to extract specific pieces of data from the store. They provide a way to access the state in a structured manner.
Middleware:
In Redux, middleware is a piece of code that sits between the dispatching of an action and the actual execution of that action by the reducer. It's used to add extra functionality to the Redux store, such as handling asynchronous actions, logging, or modifying actions before they reach the reducer.
Let's understand these concepts with a simple Add-to-Cart project:
How to use Redux in your project
If you don't have a React application yet, you can create one using the Create React App (CRA) or any other method you prefer. To create a new React app using CRA, open your terminal and run the following command:
npx create-react-app my-shopping-cart
Then navigate to your React project's directory:
cd my-shopping-cart
Install Redux and React Redux:
npm install redux react-redux
Inside your project directory, run the following command to install Redux and React Redux:
npm install react-redux
or
yarn add react-redux
Now you are ready to use redux.
Setting Up Redux in your project:
Step 1: How to set up Redux Actions:
Let's create our actions. As previously mentioned, actions encapsulate events or occurrences within the application. For example, when a user adds a new Item to the cart, it triggers an "Add-Item" action. Similarly, when a user removes an item, it triggers a "Delete-item" action.
To create the actions, create two folders called "actions" and "actionsTypes" in the src directory and then create a new file called cartAction.js in the "actions" folder.
This file will serve as the repository for all the functions dedicated to generating actions within our application. And actionTypes.js in "actionsTypes". This file will contain all of the action types for our application in our case Add-Item and Delete-Item.
Add the following code in the actionTypes.js file:
export const ADD_ITEM = "ADD_ITEM";
export const DELETE_ITEM = "DELETE_ITEM";
ADD_ITEM = "ADD_ITEM": This line assigns the string "ADD_ITEM" to the constant ADD_ITEM. It's a unique identifier used to represent the action of adding an item in a Redux application.
DELETE_ITEM = "DELETE_ITEM"; Similarly, this line assigns the string "DELETE_ITEM" to the constant DELETE_ITEM. It's used to represent the action of deleting or removing an item from the state in Redux.
Add the following code in cartAction.js file:
import { ADD_ITEM, DELETE_ITEM } from "../actionTypes/actionTypes";

const addItem = () => {
  return {
    type: ADD_ITEM,
  };
};

const deleteItem = () => {
  return {
    type: DELETE_ITEM,
  };
};

export { addItem, deleteItem };
This code defines two Redux action creators: addItem and deleteItem. They create actions with types ADD_ITEM and DELETE_ITEM, respectively, to signal specific state changes when dispatched in a Redux application.
step2: How to set up reducers:
In the src directory, create a new folder called reducers, and inside that folder, create new files cartReducer.js and add the following code:
import { ADD_ITEM, DELETE_ITEM } from "../actionTypes/actionTypes";

const initialState = {
  numOfItems: 0,
};

export  const cartReducer = (state = initialState, action) => {
  switch (action.type) {
    case ADD_ITEM:
      return {
        ...state,
        numOfItems: state.numOfItems + 1,
      };

    case DELETE_ITEM:
      return {
        ...state,
        numOfItems: state.numOfItems - 1,
      };
    default:
      return state;
  }
};
As mentioned earlier, reducers in Redux are functions that specify how different parts of your application's state should be updated when certain actions are dispatched.
The code above represents the state management for a shopping cart. Initially, the shopping cart had no items in it. The code monitors and responds to different actions.
When an "ADD_ITEM" action occurs, it means a new item is added to the cart. In response, the code increments the item count in the cart.
Conversely, if a "DELETE_ITEM" action occurs, indicating the removal of an item, the code decreases the item count in the cart.
For any other action that doesn't match "ADD_ITEM" or "DELETE_ITEM," the code simply maintains the current item count in the cart without making any changes.
step3: How to create the Redux store
To create a redux store, create a new file called store.js in the src directory and add the following code:
import { createStore } from "redux";
import { cartReducer } from "./reducers/cartReducer";

const store = createStore(cartReducer);

export default store;
This code establishes a Redux store, a pivotal part of state management in Redux. The store acts as a central repository that holds the complete state of the application. In this context, it's specifically tailored to manage the state of a shopping cart.
The cartReducer function, which defines how the cart's state responds to various actions (such as adding or removing items), is employed to configure the store. Once the store is created, it's exported, making it accessible to other sections of the application. This facilitates the consistent and structured management of the shopping cart's state throughout the app, ensuring that data remains synchronized and easily manipulable across different components and actions.
Step 4: How to connect the Redux Store to the application:
To connect the Redux store to the add-to-cart application, we need to use the Provider component from the react-redux library.
In your main application file (usually src/index.js or src/App.js), wrap your entire application with the Provider component from react-redux. The Provider component ensures that the Redux store is accessible and shared with all components throughout your application. Add the following code to your main application file:
import "./App.css";
import { Provider } from "react-redux";
import store from "./store";
import Cart from "./component/Cart";

function App() {
  return (
    <Provider store={store}>
      <Cart />
    </Provider>
  );
}

export default App;
Step 5: How to dispatch actions:
Now that we've established the essential actions, we can proceed to develop the components responsible for triggering and dispatching these actions.
Now, Let's create a new folder named "components" inside the src directory. Inside this folder, we will create new file: Cart. jsx.
The Cart. jsx component will be responsible for adding and removing items from the cart. Before we continue, we should include the following imports into the file:
import React from "react";
import { AiOutlineShoppingCart } from "react-icons/ai";
import { useSelector, useDispatch } from "react-redux";
import { addItem, deleteItem } from "../actions/cartAction";
Once we have imported these necessary components, we can proceed to write code for Cart. jsx. Here, I am using react-icons. To use react icons run following command in your terminal:
npm install react-icons --save
Now add following code in your Cart.jsx component:
const Cart = () => {
const state = useSelector((state) => state);
const dispatch = useDispatch();
return (
<div className="">
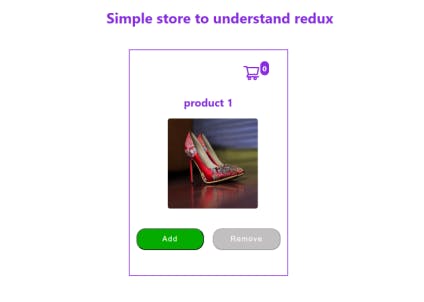
<h1>Simple store to understand redux</h1>
<div className="cart">
<div className="carticon">
{" "}
<AiOutlineShoppingCart size={40} /> <span>{state.numOfItems}</span>
</div>
<h2>product 1</h2>
<img
src="https://cdn.pixabay.com/photo/2016/03/27/22/16/fashion-1284496_640.jpg"
alt=""
/>
<div className="btn">
<button
className="green"
onClick={() => {
dispatch(addItem());
}}
>
Add
</button>
<button
className="red"
disabled={state.numOfItems > 0 ? false : true}
onClick={() => {
dispatch(deleteItem());
}}
>
Remove
</button>
</div>
</div>
</div>
);
};
export default Cart;
In the code above, we created a component consisting of a title, image, cart icon, item count, and buttons. When the "Add" button is clicked, it dispatches the addItem action to the Redux store, which will increase the numOfItems count.
The "Remove" button is enabled or disabled based on whether there are items in the cart. When clicked, it dispatches the deleteItem action to reduce the numOfItems count.
useSelector is used to access the Redux store state, and useDispatch is used to dispatch actions.
Inside the component, it displays a title, an image, and buttons for adding and removing items from a shopping cart.
The cart's item count is displayed next to a shopping cart icon. This count is retrieved from the Redux store's numOfItems property using useSelector.
Step 6: Styling:
For styling, copy the following code and paste it into your app.css file.
.carticon {
  margin-left: 250px;
  margin-top: 20px;
}

.carticon span {
  margin-bottom: 20px;
  font-weight: bold;
  background: blueviolet;
  color: white;

  padding: 5px;
  border-radius: 20px;
}

button {
  margin: 10px;
  font-size: 16px;
  letter-spacing: 2px;
  font-weight: 400;
  color: #fff;
  width: 150px;
  padding: 13px 20px;
  text-align: center;
  display: inline-block;
  text-decoration: none;
  border-radius: 20px;
  cursor: pointer;
}

.btn {
  margin-top: 30px;
}
.green {
  background-color: rgb(6, 172, 0);
}
.red {
  background-color: rgb(221, 52, 66);
}
.red:disabled {
  background-color: rgb(193, 191, 191);
  cursor: not-allowed;
}

.carticon {
  width: 60px;
  height: 60px;
  display: flex;
  align-items: center;
}
.cart {
  height: 500px;
  text-align: center;
  border: 2px solid blueviolet;
  color: blueviolet;
  width: 350px;
  margin-left: 500px;
  margin-top: 50px;
}

.cart img {
  margin-left: 20px;
  width: 200px;
  height: 200px;
  border-radius: 5px;
}

h1 {
  margin-left: 450px;
  color: blueviolet;
}
Final results:
As shown above, we can add items by clicking on the "Add" button and delete items by clicking the "Remove" button next to each task.
It's crucial to emphasize that when using Redux, an application's state is maintained in memory. Consequently, if a user refreshes the page or navigates away from the application, the state will be reset and lost.
To ensure that information persists even after a user leaves or closes the page, it becomes necessary to store that data externally, beyond the app's memory. Various methods, such as local or server-side storage, can be employed to achieve this goal.
You've now acquired a solid understanding of how to incorporate Redux into your React applications. In the next section, we will explore the Redux Toolkit and discover how it can simplify the process of writing Redux code with less effort.
What is the Redux Toolkit?
Redux Toolkit is a library that streamlines the process of working with Redux. It includes utilities to simplify common Redux tasks and follows best practices, making it easier to manage the state in your application.
Advantages of Redux Toolkit:
Boilerplate Reduction: Redux Toolkit significantly reduces the amount of boilerplate code required to set up a Redux store, define reducers, and create actions. This leads to more concise and maintainable code.
Simplified Store Configuration: Redux Toolkit provides the configureStore function, which simplifies store configuration by setting up common middleware, such as Redux Thunk, automatically. This reduces the need for manual setup and configuration.
Built-in Immutability: Redux Toolkit internally uses the Immer library, which allows you to write reducers that modify state in a mutable way while producing immutable state updates. This makes it easier to work with complex state structures.
Slices: Redux Toolkit introduces the concept of "slices," which encapsulate related reducer logic, actions, and selectors into a single module. Slices help organize and modularize your code, making it more maintainable and scalable.
Core Concepts:
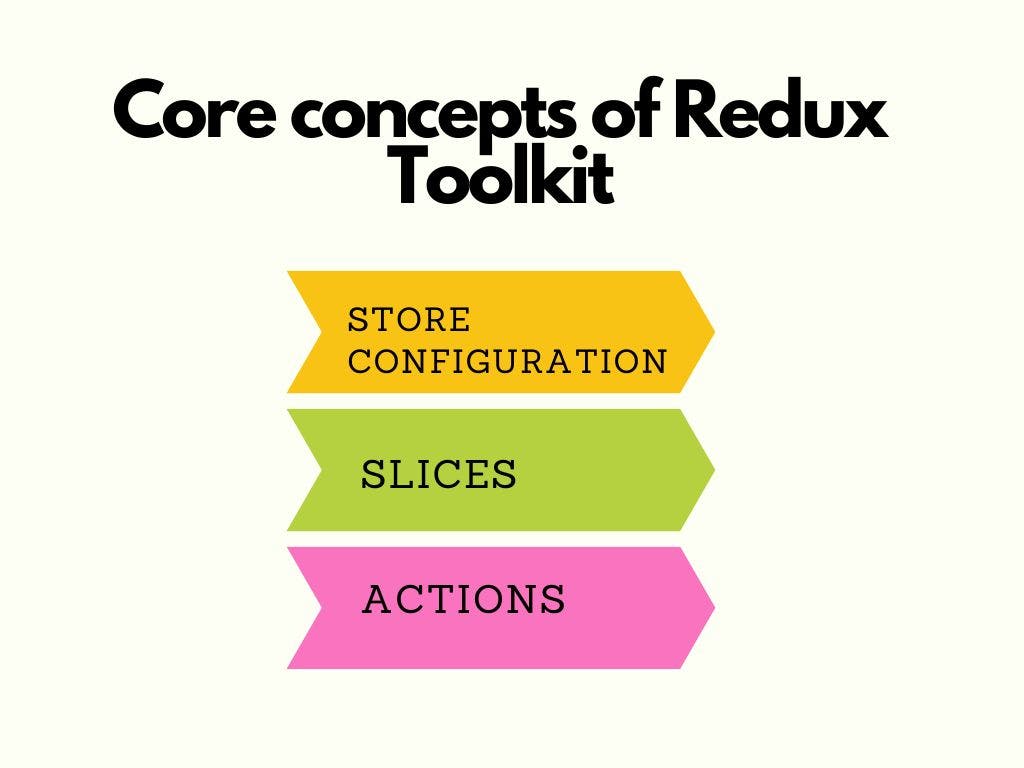
Store Configuration
Redux Toolkit provides a configure store function that simplifies the creation of the Redux store by setting up sensible defaults and including built-in middleware like Redux DevTools.
Slices
A slice is a portion of your Redux store that holds a specific piece of state and includes the associated reducer and actions. Slices help you organize your code and reduce the complexity of your reducers.
Actions
Actions in the Redux Toolkit are created using the createSlice function. They generate action creators and reducers automatically, reducing the need for writing repetitive boilerplate code.
Setting Up Redux Toolkit:
Open your project's terminal.
Navigate to your project's root directory if you're not already there.
Run the provided command to add Redux Toolkit to your project:
npm install @reduxjs/toolkit
or
yarn add @reduxjs/toolkit
How to create a slice:
After successfully installing the required dependencies, you can proceed by using the createSlice function to establish a new "slice." In Redux, a slice represents a dedicated section of the store responsible for overseeing a particular segment of the application's state.
Consider the Redux store as a cake, where each "slice" corresponds to a distinct portion of data within that cake. By creating a slice, you can define the behavior of the state in response to particular actions using reducer functions.
To create a slice to manage our add-to-cart application, create a new file named src/features/cartSlice.js and add the following code.
import { createSlice } from "@reduxjs/toolkit";

const initialState = {
  numOfItems: 0,
};

const cartSlice = createSlice({
  name: "cart",
  initialState,
  reducers: {
    addItem: (state) => {
      state.numOfItems += 1;
    },
    deleteItem: (state) => {
      if (state.numOfItems > 0) {
        state.numOfItems -= 1;
      }
    },
  },
});

export const { addItem, deleteItem } = cartSlice.actions;
export default cartSlice.reducer;
This is how the above code works:
Import createSlice: Import the createSlice function from @reduxjs/toolkit. It's a part of the Redux Toolkit and simplifies the process of creating Redux slices.
Initial State: Define an initial state object, initialState, which contains the numOfItems property initialized to 0. This represents the initial state of the cart.
Create a Slice: Use the createSlice function to create a Redux slice named "cart." This function takes an object with the following properties:
name: A string that represents the slice's name.
initialState: The initial state object.
reducers: An object that defines the reducer functions and their logic.
Reducers: Inside the reducers object, define two reducer functions:
addItem: This function takes the state as an argument and increments state.numOfItems by 1 when called.
delete item: This function also takes the state as an argument but decreases state.numOfItems by 1 when called, but only if state.numOfItems is greater than 0.
Export Action Creators and Reducer: Export the action creators and reducer generated by createSlice. The action creators (addItem and deleteItem) can be used to dispatch actions that trigger state updates. The reducer is what updates the state based on the dispatched actions.
How to set up the Redux Store:
Creating a Redux store is much simpler with the Redux Toolkit.
The most basic way to create a store is to use the configureStore() function, which automatically generates a root reducer for you by combining all the reducers defined in your application.
To set up a store for your application, you can create a file called src/store.js and include the following code:
import { configureStore } from "@reduxjs/toolkit";
import cartReducer from "./features/cartSlice";

const store = configureStore({
  reducer: {
    cart: cartReducer,
  },
});

export default store;
This code configures and exports a Redux store using the Redux Toolkit. The store is set up to manage the "cart" state using the part reducer. This store can then be integrated into your React application to handle shopping cart-related state management.
How to Create Components:
You can now create a React component such as Cart.jsx that uses the useSelector hook to access the current state from the store. Likewise, you can employ the useDispatch hook to dispatch actions for updating the store, mirroring the same process as in traditional Redux.
At this point, your application should resemble the previous version with a handful of enhancements from Redux Toolkit, resulting in significantly reduced code maintenance.
Final Words:
In this article, we explored Redux and Redux Toolkit, starting with core concepts and culminating in a practical "Add to Cart" project.
If you've been following this tutorial, you should now possess a strong comprehension of Redux, encompassing both the conventional method and the streamlined approach utilizing the Redux Toolkit.
Thank You for reading!